How To Use a Clutch
Learn to drive with confidence on the Isle of Wight
Friendly & Patient Driving Instructors
Driving Instructors Isle of Wight
⭐️⭐️⭐️⭐️⭐️ Rated 5/5 On Google by local learners
DVSA-Approved Driving Instructor
How to use a clutch smoothly is one of the biggest hurdles for new drivers – but once it “clicks”, everything else in manual driving gets much easier. This guide breaks it down step-by-step, exactly as we teach it during your driving lessons.
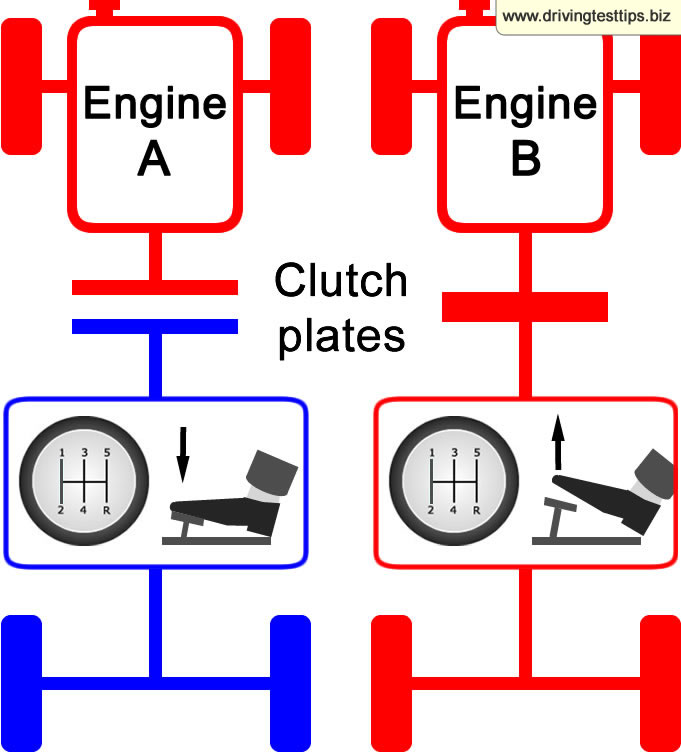
1. What the Clutch Does
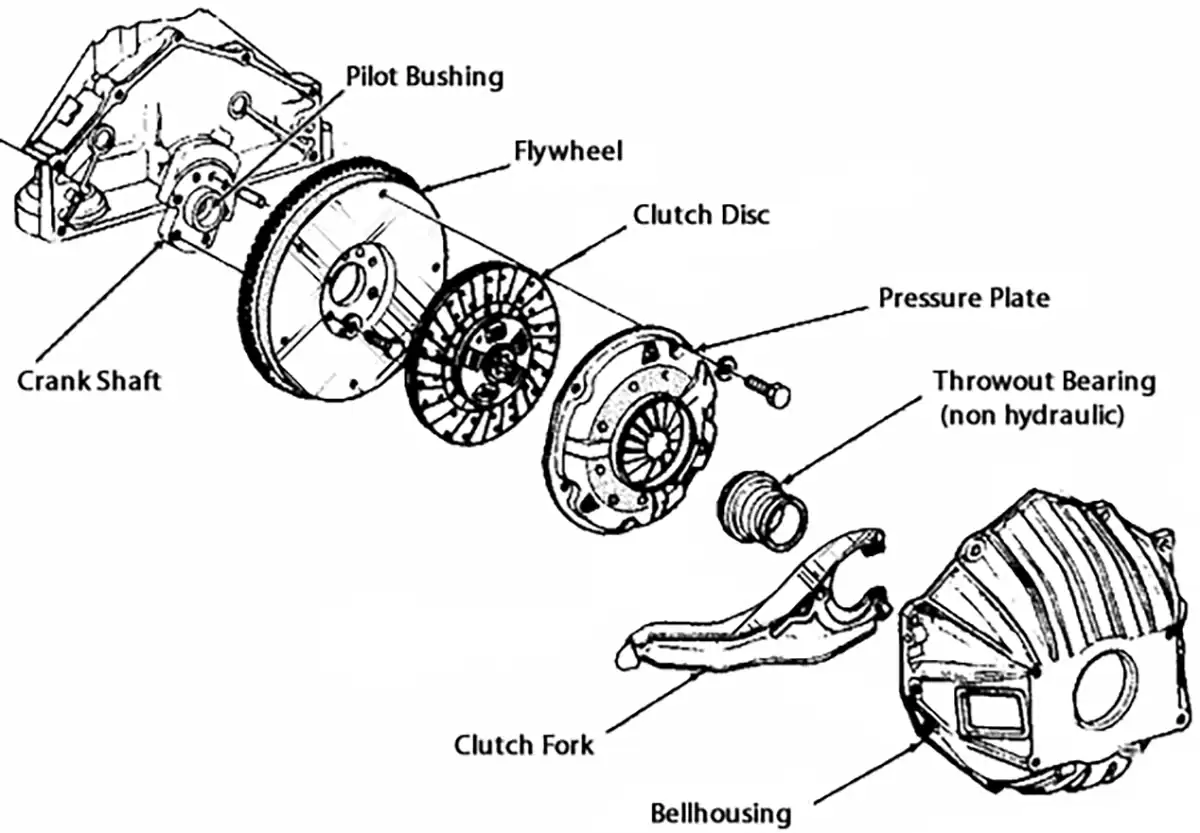
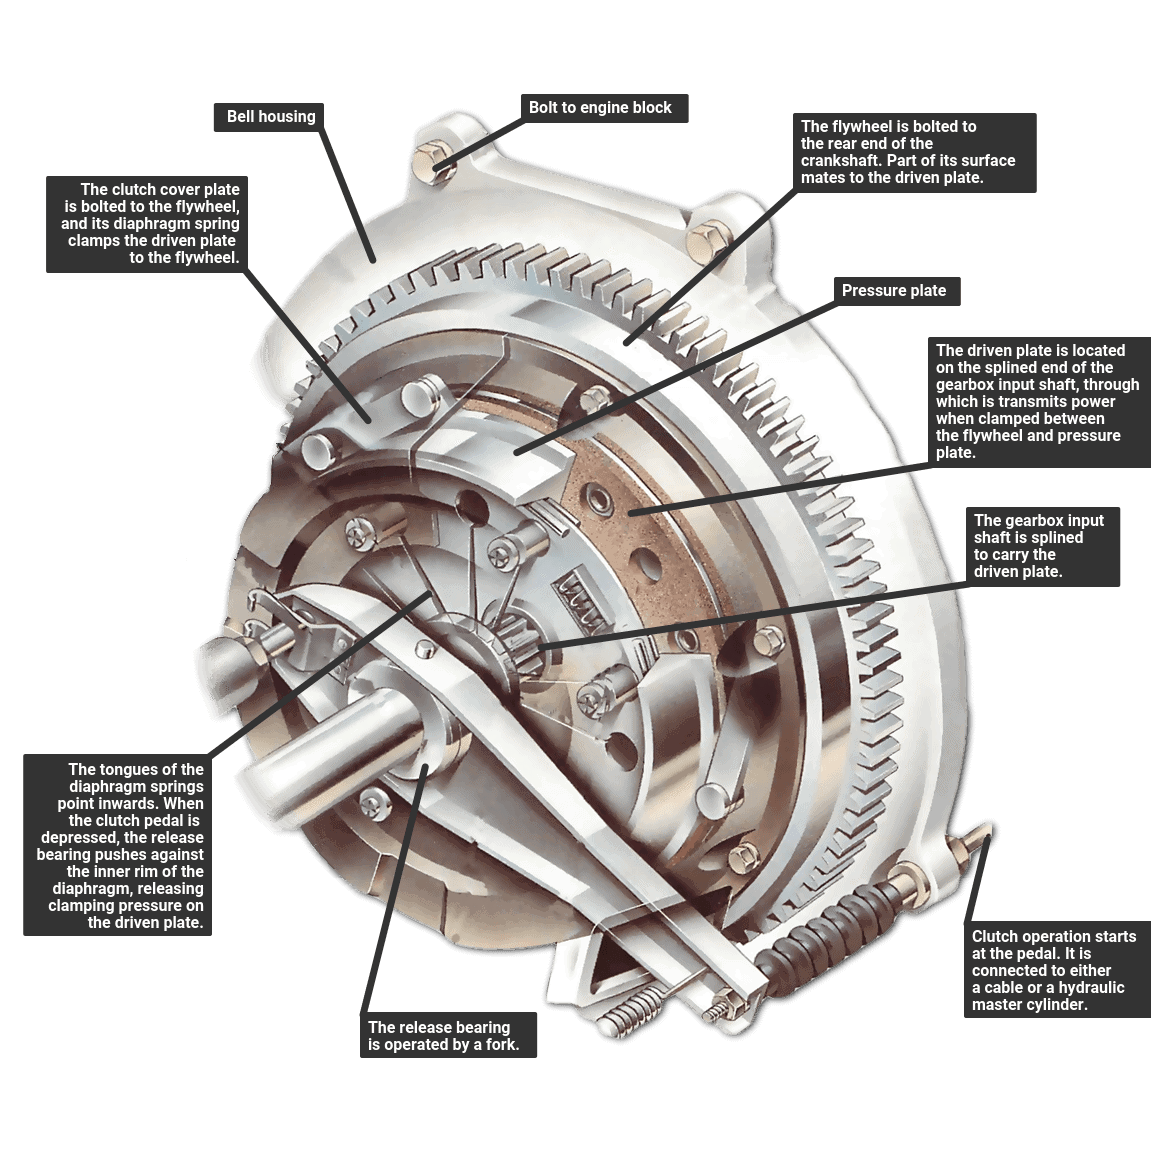
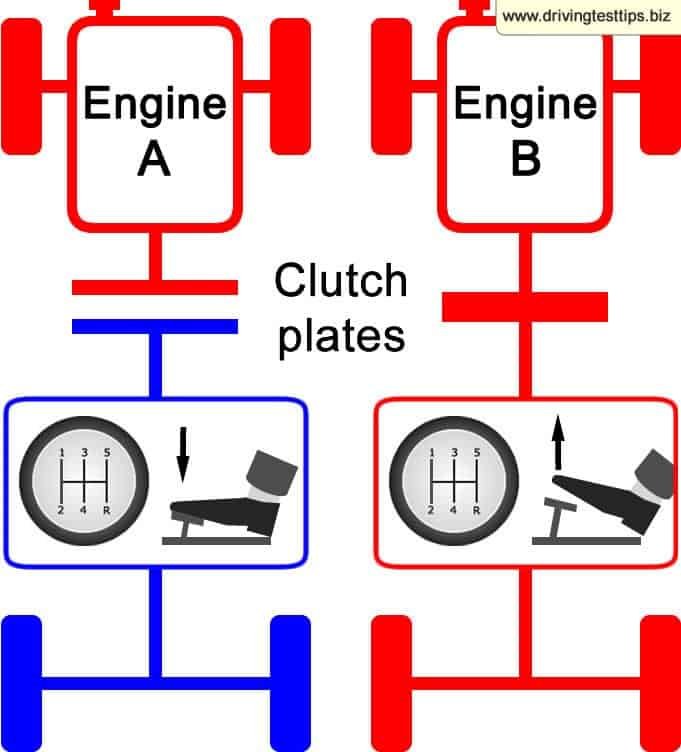
The clutch is a connect/disconnect link between the engine and the wheels.
- Pedal up → connected
- Pedal down → disconnected
- Halfway (biting point) → plates starting to engage
2. Getting Set Up Correctly
Seating
- You must reach the clutch fully
- Knee slightly bent
Foot Position
- Ball of foot on pedal
- Heel on floor for stability
3. Stage One: Getting Used to the Pedal
Practise pressing and releasing the clutch with the engine off to understand its travel and feel.
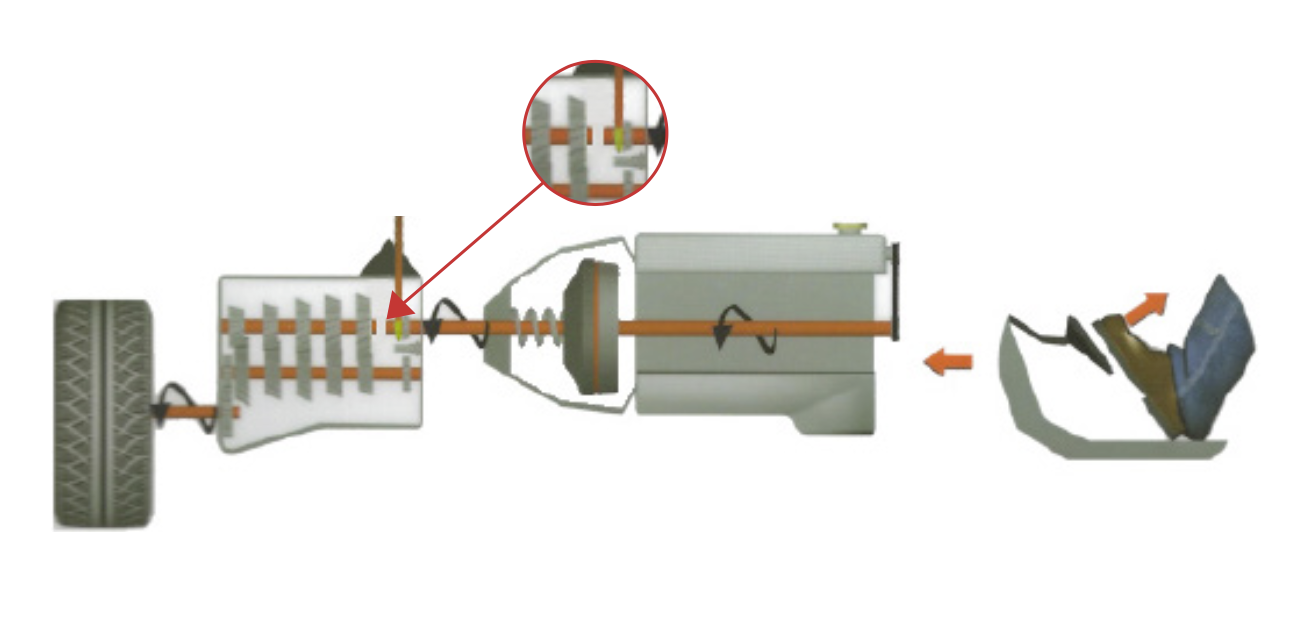
4. Stage Two: Finding the Biting Point
Here’s where the clutch plates begin to meet.
Insert Diagram: Biting Point
How To Use a Clutch: Biting Point Practice With No Gas
Some instructors (including us!) teach initial bite control without any gas to help learners feel the clutch better and reduce early stalling.
Why We Teach It
- Removes complexity → learners focus on one pedal
- Teaches true clutch feel
- Reduces stalling
- Builds confidence
Release the Clutch Slowly (No Gas Yet)
- Gently lift your left foot by tiny amounts — millimetres, not inches.
- Listen: the engine note may dip as it begins to take on power.
- Feel: the clutch pedal vibrates slightly, and the car strains against the handbrake.
- See: the car might dip at the front or rock gently.
This is the biting point. Hold your foot steady here.
Practise Holding the Biting Point
5. Moving Off Smoothly
Moving-Off Steps

Steps
- Set gas
- Bring clutch to bite
- Mirrors → signal → blind spot
- Release handbrake
- Car moves
- Raise clutch fully
6. Changing Gears
Insert Diagram: Gear-Change Flowchart
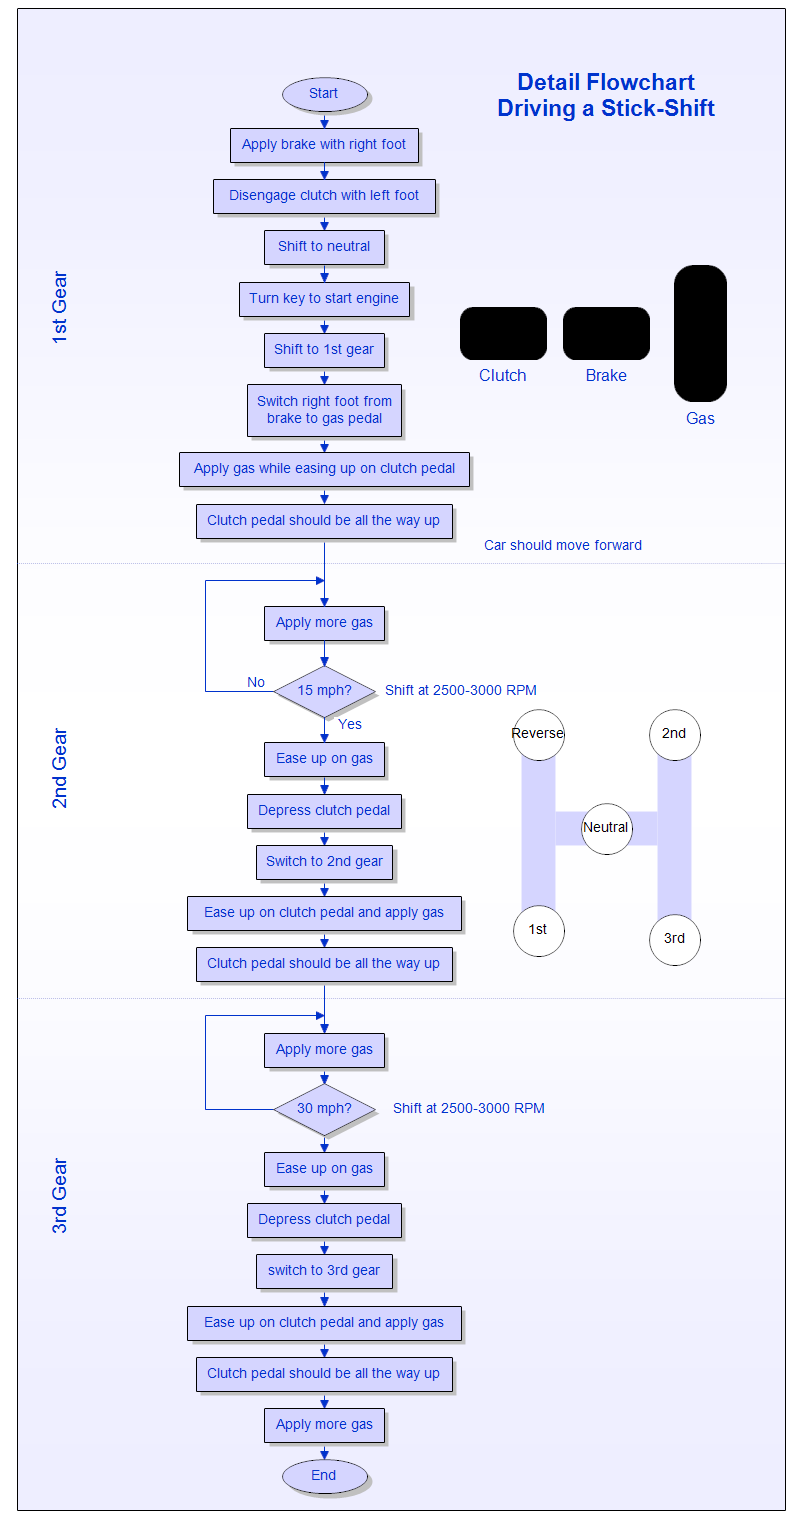
Upward Gear Change
- Off gas
- Clutch down
- Select gear
- Clutch up
- Add gas
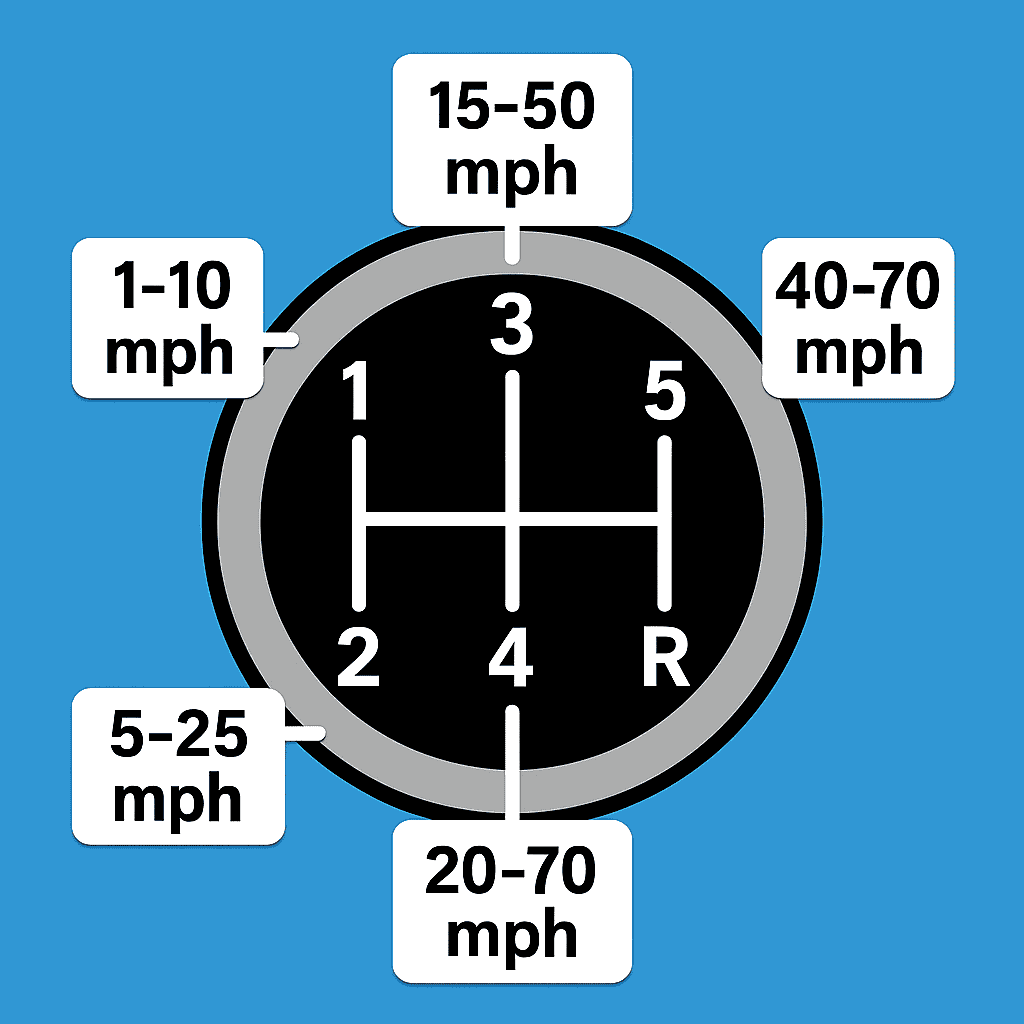
7. Speed Ranges for Each Gear
Example typical ranges:
- 1st: 0–10 mph
- 2nd: 10–20 mph
- 3rd: 20–30 mph
- 4th: 30–40+ mph
- 5th: 40–70+ mph
8. Low-Speed Clutch Control
Ideal for traffic, manoeuvres and tight spaces.
- Slightly above bite → slow movement
- At bite → hold steady
- Below bite → slow/stop
9. Hill Starts
Insert Diagram: Hill Clutch Control
Steps
- More gas (2,000 rpm)
- Strong biting point
- Release handbrake
- Lift clutch smoothly
10. Protecting Your Clutch
Avoid:
- Riding the clutch
- Holding on the bite on hills
- Snatching the pedal up
11. Common Learner Problems & Fixes
Stalling:
→ More gas + slower clutch lift
Jerky gear changes:
→ Practise rhythm: off gas → clutch down → gear → clutch up → gas
Rolling on hills:
→ Handbrake technique + firm bite
12. Clutch Lessons With Humphrey’s Driving School
We teach clutch control with a calm, structured approach — starting in quiet areas, progressing to real traffic and hills when you’re ready. Just tell your instructor what you want to practise more, and the lesson is tailored for you.
Tips for Learner Drivers
- Go slow – lift the clutch gradually to feel the engagement point.
- Don’t panic if you stall – every learner does. Reset calmly and try again.
- Wear thin-soled shoes – so you can feel pedal feedback more clearly.
- Remember every car is different – biting points vary by vehicle.
- Practise hill starts – once confident, practise on slopes for better control.
❓ FAQs About the Biting Point
1. What is the biting point in driving?
It’s the moment when the clutch plates start to grip, transferring power from the engine to the wheels so the car can move.
2. How do I know I’ve found it?
You’ll notice a change in engine note, a slight vibration, and the car straining against the handbrake.
3. Why do learner drivers stall at the biting point?
Stalls happen when the clutch comes up too fast or there isn’t enough gas. The balance takes practice.
4. Is the biting point the same in every car?
No. Some cars have a high biting point, others lower. Always practise in the car you’ll be tested in.
5. Do I always need to use the biting point?
Yes — whenever you move off in a manual car. It’s especially important on inclines and in stop-start traffic.
Conclusion
Finding the biting point may feel challenging at first, but it is a skill every manual driver must master. With patience, practice, and a calm approach, you’ll soon be able to control the car smoothly, avoid stalls, and tackle hill starts with confidence.
The more you practise, the more natural it becomes — until using the biting point is second nature every time you set off.
Apply for your Provisional driving Licence Here: DVSA
Send an Enquiry
Or, fill in the form below. Providing your post code helps me check my availability in your area so I can suggest possible lesson slots when I contact you.
Driving Lessons Isle of Wight
Humphreys Driving School is based in Ryde but covers towns and villages across the island.
Ryde, Brading, East Cowes, Newport, Sandown, Shanklin, Seaview, St Helens Wootton Bridge, Ventnor, Bembridge
