How to Position a Car: & Keep It Straight
Driving Lessons in Ryde & across the Isle of Wight
Automatic and Manual Driving Lessons
Friendly & Patient Driving Instructors
⭐️⭐️⭐️⭐️⭐️ Rated 5/5 On Google by local learners
Grade A DVSA-Approved Driving Instructor

Welcome to this step-by-step guide from Humphreys Driving School.
If you’re just starting out, learning how to keep the car straight can feel surprisingly tricky — but with the right technique and a bit of practice, it quickly becomes second nature.
This guide explains exactly where to look, how to guide the car smoothly, and how to build confidence in your steering.
Written especially for complete beginners on their first lessons.
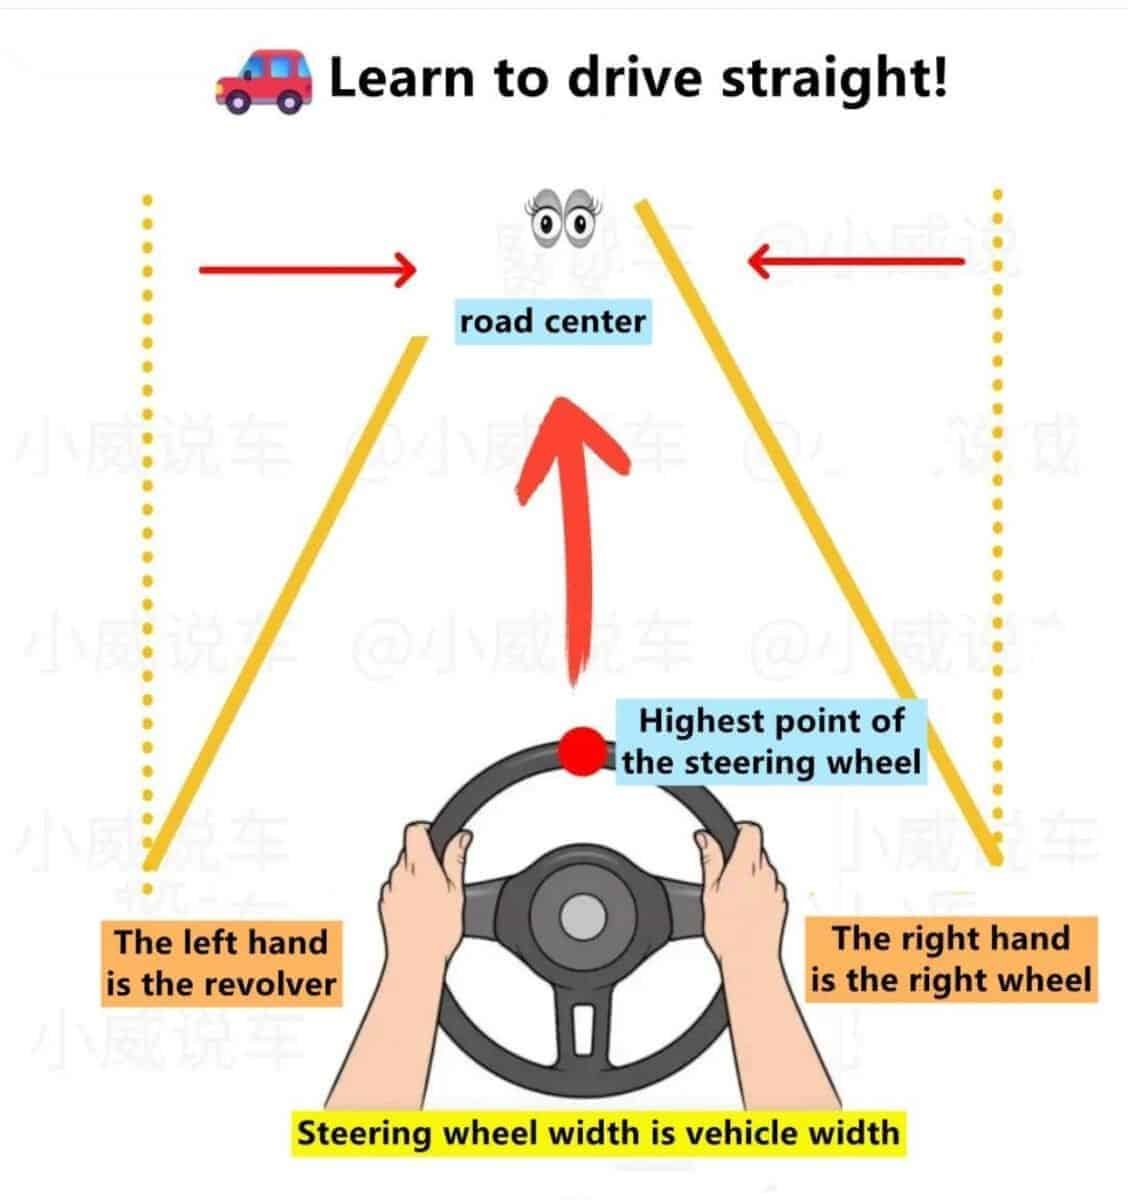
⭐ 1. The Golden Rule: Your Hands Follow Your Eyes
Most new drivers make the same mistake — they look too close to the front of the car.
This causes weaving because you naturally steer towards whatever you’re focusing on.
At Humphreys Driving School, we teach a simple rule:
🔵 Look where you want the car to go.
Not at the kerb.
Not at the bonnet.
But far ahead, down the road.
Aim your eyes roughly:
- 12–15 seconds ahead,
- towards the centre of your lane,
- keeping the road edges in your peripheral vision.
When you look far ahead:
- your steering becomes smoother
- your car stays straighter
- you feel calmer and more in control
⭐ 2. Getting Set Up: Your Driving Position Matters
Before positioning the car, make sure you are positioned correctly:
- Sit upright with good support from the seat.
- Hands at 9 & 3 (sometimes called quarter-to-3).
- Wrists slightly bent — no stiff arms.
- Make sure you can steer without leaning forward.
A good driving position = better accuracy and less over-steering.
⭐ 3. How to Keep the Car Straight (Beginner Method)
🔶 Step 1 — Pick a reference point ahead
Choose a fixed point well down the road — a lamppost, the centre of the lane, a road sign, or simply the far end of the road.
🔶 Step 2 — Glance (don’t stare) at road edges
Use the left kerb and centre line as gentle guides, not targets.
If you stare at the kerb, you’ll drift towards it.
🔶 Step 3 — Steer with small movements
Think of steering as guiding rather than turning.
Tiny adjustments keep the car centred.
🔶 Step 4 — Stay relaxed
A tight grip causes over-correction.
Relax your hands and shoulders.
⭐ 4. What the Correct Road Position Looks Like
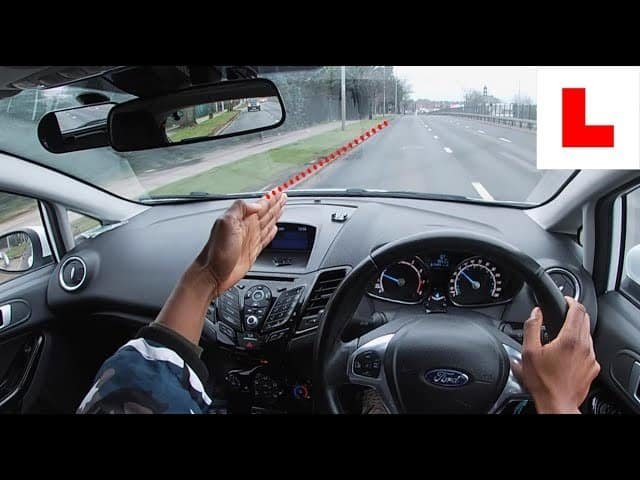
When you’re in the correct position:
- The left kerb should sit near the lower-left corner of your windscreen view.
- The centre line (if present) should appear near the right side of your windscreen.
- The car should feel evenly spaced between both sides of the lane.
This view becomes your personal reference picture, and every learner develops theirs naturally.
⭐ 5. Passing Parked Cars or Narrow Gaps
Once your straight-line control is improving, we apply the same principles around obstacles.
At Humphreys we teach:
- Keep roughly a door’s width from parked vehicles where possible.
- If the gap is tight — slow down.
- Look ahead past the obstacle, not at it.
- Plan early if the road is narrowing.
Your eyes will guide the car safely around the hazard.
⭐ 6. Common Beginner Mistakes (And How We Fix Them)
❌ Looking at the bonnet
Makes the car feel unstable.
👉 Solution: Look further ahead.
❌ Staring at the kerb
Your hands will steer towards it.
👉 Solution: Glance only; keep main focus ahead.
❌ Over-steering
Large, fast movements = weaving.
👉 Solution: Slow, gentle corrections.
❌ Holding the wheel too tightly
Causes jerky steering.
👉 Solution: Light, relaxed hands.
⭐ 7. Practising With Humphreys Driving School
On your first lessons, we practise in:
- quiet roads
- clear straight sections
- simple reference-point exercises
We build your confidence gradually:
- Keeping straight for 100–200 metres
- Feeling the difference between small and large inputs
- Positioning in different road widths
- Moving on to passing parked cars
By your second or third lesson, most learners see a huge improvement.
💛 Summary
✔ Look far ahead (not at the kerb or bonnet)
✔ Use gentle steering inputs
✔ Use the left kerb and centre line as guides
✔ Stay relaxed and steady
✔ Practise on quiet roads first
Keeping the car straight is all about where you look and how you guide the wheel.
With our calm, structured teaching approach, it becomes natural very quickly.
🚗 ADVANCED CAR POSITIONING
Humphreys Driving School – Learner Driver Guide
Car positioning is all about where you place your vehicle on the road so that you stay safe, predictable, and perfectly set up for whatever happens next.
Good positioning =
• Better hazard perception
• Smoother driving
• Higher test scores
• Lower stress
Below is your full, attractive, WordPress-ready version.
🔰 INTRO – WHY GOOD POSITIONING MATTERS
Your car position affects everything you do on the road:
• How early you see hazards
• Whether others can predict your actions
• How much space you leave for yourself and others
• How safe, smooth and controlled your driving feels
Think of positioning like “body language” for your car.
It tells everyone what you intend to do — before you do it.
🛣️ THE CORE PRINCIPLES OF CAR POSITIONING
1) Keep a safe distance from the left
• Avoid driving too close to the kerb
• Avoid drifting too far to the centre
• Aim for a natural, centred lane position
2) Never straddle the middle line
• Hogging the centre feels unsafe to other drivers
• Test examiners expect a clear, confident lane position
3) Adapt your position based on hazards
You may need to move slightly to:
• Give cyclists more space
• Avoid parked cars
• Prepare for junctions
• Follow road markings
4) Stay predictable
Smooth, early positioning helps other road users understand your intentions.
🌟 YOUR “GOLDEN DRIVING LINE”
This is the imaginary line your vehicle follows through:
• Straight roads
• Bends
• Roundabouts
• Lane changes
A good Golden Line means you:
✓ Stay central
✓ Stay steady
✓ Keep a constant safe distance from hazards
Bad positioning: weaving, drifting, guessing.
Good positioning: flowing, stable, confident.
🪄 STEP 1 – NORMAL DRIVING POSITION
(Your default position on any road)
Your car should sit:
• Approx. 1 metre from the kerb
• Not touching, hugging, or drifting toward it
• Not too far into the centre line
• Centred between lane markings where present
Visual idea:
“Your car should sit naturally between left and right — not too tight, not too wide.”
Common learner mistake:
Looking too close to the bonnet → drifting left.
Look further ahead → smoother, straighter steering.
🚴 STEP 2 – POSITIONING FOR VULNERABLE ROAD USERS
(Cyclists, scooters, horses, pedestrians)
Give plenty of space:
Cyclists: At least a car door’s width (1.5m where possible)
Horses: Slow right down + leave gentle space
Pedestrians near the road: Widen slightly where safe
Tip:
“If in doubt, give more space, not less.”
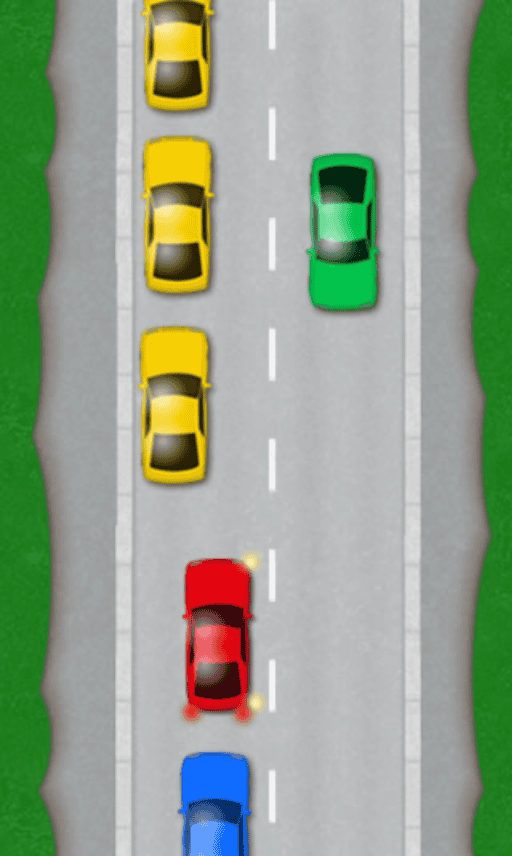
🚘 STEP 3 – POSITIONING AROUND PARKED CARS
When approaching parked cars on your side:
- Check mirrors
- Decide if you need to move out
- Give a full door’s width where possible
- Pass slowly if the gap is tight
- Shoulder check if moving significantly across the road
Key rule:
Always assume a door could open at any moment.
Position yourself so you would remain safe even if they opened a door suddenly.
🌫️ STEP 4 – POSITIONING ON NARROW ROADS
On narrow or rural roads:
• Reduce speed
• Move more towards the centre when safe
• Move back left when meeting oncoming traffic
• Be prepared to stop early to allow others through
Little saying to remember:
“Slow in → Safe out.”
🔄 STEP 5 – POSITIONING AT JUNCTIONS
Turning Left
• Keep close to the left before turning
• Avoid drifting out wide
• Arrive at a slight angle so the turn is smooth and controlled
Turning Right
• Stay just left of the centre line
• Avoid cutting across centre markings too early
• Line up your vehicle so the turn is neat and accurate
Emerging from Side Roads
• Stop in a straight line
• Do not angle your car unless turning right on a very narrow street
Good positioning here = examiners notice.
🌀 STEP 6 – ROUNDABOUT POSITIONING
(One of the most test-critical skills)
Approach:
• Choose the correct lane early
• Position clearly into that lane
• Use your mirrors BEFORE you move over
On the roundabout:
• Keep your lane
• Follow the curve smoothly
• Don’t drift or cut across white lines
Exiting:
• Move gently towards the left
• Check LEFT mirror for cyclists or motorbikes
Examiners LOVE clean lane discipline.
🛣️ STEP 7 – LANE POSITIONING ON DUAL CARRIAGEWAYS
Normal driving lane = Always the left lane
Use the right lane only when:
• Overtaking
• Turning right
• Directed by signs
When changing lanes:
• Mirror → Mirror → Shoulder → Move
• Make it smooth, not sudden
• Early, gentle positioning = confident driving
📏 STEP 8 – GAP SELECTION & BUFFER SPACE
Your position should always leave a safety bubble around your car.
This bubble helps protect you from:
• Pedestrians stepping out
• Cars swerving
• Cyclists wobbling
• Doors opening
• Potholes
• Blind bends
The bubble shrinks at higher speeds — so give yourself MORE space.
⚠️ COMMON POSITIONING PROBLEMS
• Drifting too close to the kerb
• Wobbling or weaving within the lane
• Sitting too close to the centre line
• Positioning too late at junctions
• Cutting corners on left or right turns
• Approaching bends too fast
• Incorrect lane on roundabouts
A great self-check:
“Would someone watching me think I look confident and predictable?”
⭐ GOOD POSITIONING LOOKS LIKE THIS:
✓ Smooth
✓ Steady
✓ Early
✓ Clear
✓ Controlled
✓ Confident
✓ In the correct place for the next manoeuvre
🏁 SUMMARY – THE POSITIONING CHECKLIST
Your positioning is right when:
• You are centred on the road
• You give safe space to hazards
• You adjust early before turning
• You maintain your lane accurately
• You don’t drift, wobble or wander
• You always pair positioning with mirror checks
Good car positioning transforms your driving —
and at Humphreys Driving School, we’ll make sure you master it.
❓ Frequently Asked Questions (FAQs)
General Positioning & Straight Driving
Q: Why does my car keep drifting to the left (or right) when I try to drive straight?
A: This is the most common beginner issue! It’s usually caused by one of two things:
1. Looking Too Close: You are likely looking only at the bonnet or the immediate roadside. Your hands automatically steer towards what your eyes are focused on.
Solution: Follow the Golden Rule—look 12–15 seconds ahead, down the centre of your lane. Your steering will smooth out as your focus extends.
2. Stiff Arms/Overtight Grip: A tight grip on the wheel makes you over-correct (wobble).
Solution: Relax your shoulders, hold the wheel lightly at the 9 & 3 position, and use small, gentle “guiding” inputs instead of large turns.
Q: How can I tell if I am exactly 1 metre from the kerb?
A: You will never be able to measure it exactly. Instead, you need to find your personal reference picture.
When you are positioned correctly, the left kerb should appear in a certain spot on your windscreen (usually near the lower-left corner).
Your instructor will help you find this visual sweet spot. Once you know what it looks like when you’re 1 metre away, you’ll naturally maintain that space without having to think about it.
Q: Is it a serious fault (fail) if I briefly touch the kerb?
A: It depends on the severity.
A very light touch or momentarily running slightly close to the kerb is usually a minor fault if you correct it quickly and safely.
Mounting the kerb (driving up onto it) or hitting it with force, especially at speed, is classed as an uncontrolled action and would result in a serious fault (immediate fail) for the danger it presents.
Positioning for Manoeuvres
Q: What is the correct position when I’m waiting to turn right at a junction?
A: You should position your car so that you are:
Slightly left of the centre line (in your lane).
You must not cross the centre line or obstruct traffic coming the other way unless necessary.
This position sets you up for an accurate turn into the new road and allows any vehicle behind you (if there is room) to pass on your left if safe.
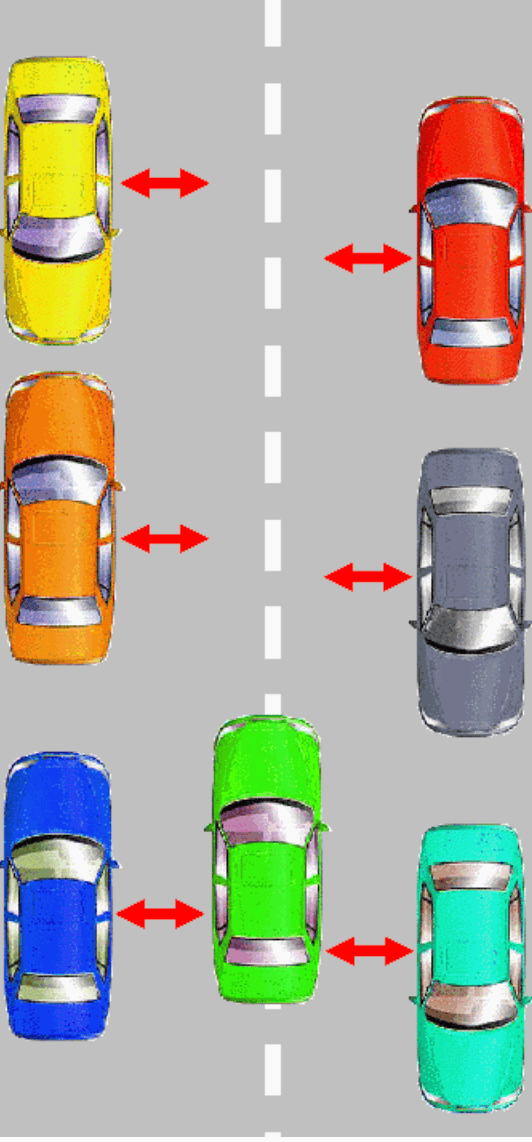
Q: How much space should I leave when passing parked cars?
A: The standard advice is to leave at least a door’s width (about 1 metre) from the parked car. Where possible, you should aim for 1.5 metres (or more) to give safe space to cyclists or pedestrians.
The Golden Rule: Always leave enough space so that if a car door were suddenly opened, you would not hit it. If the road is too narrow for this, you must stop and wait for the gap to clear.
Q: How does positioning change when going around a corner or bend?
A: The key is to drive an imaginary ‘Golden Line’.
Approach: Start wide and look through the bend.
Apex: Gently move towards the inner edge (the apex) of the bend.
Exit: Smoothly move back to your normal centred lane position as you exit the corner.
This technique improves stability, visibility, and control.
Learning & Practice
Q: My instructor keeps saying I’m weaving. How do I stop over-correcting?
A: Weaving is a result of looking too close and making corrections that are too large.
Look Far Ahead: Reset your eyes to focus on a point 12–15 seconds down the road.
Soften Your Hands: Use only tiny, gentle movements on the steering wheel, thinking of them as fine adjustments rather than steering actions. The car will not drift immediately; you have time to make small corrections.
Q: When will I stop having to think about where to position the car?
A: Positioning moves from a conscious skill to a subconscious habit quickly.
Most learners notice a huge improvement by their second or third lesson on quiet roads.
It becomes natural once you stop looking at your bonnet and start trusting your peripheral vision and that “look where you want to go” rule.
Start Your Driving Journey Today
Whether you’re ready to book your first lesson, need help with test preparation, or just want to ask a few questions, I’m here to help.
Get in touch today and take the first step towards freedom and confidence on the road.
Call now: 📞 07840 313390
Apply for your Provisional driving Licence Here: DVSA
Send an Enquiry
Or, fill in the form below. Providing your post code helps me check my availability in your area so I can suggest possible lesson slots when I contact you.

Driving Lessons Across the Isle of Wight
Humphreys Driving School is based in Ryde but covers towns and villages across the island.
Ryde, Brading, East Cowes, Newport, Sandown, Shanklin, Seaview, St Helens Wootton Bridge, Ventnor, Bembridge